Quercus uses Modules and Pages to add and organize course content. You can upload files such as your syllabus or PowerPoint presentations directly into your course in order to share them with students.
- Adding Content using Modules
- Adding a link to a video URL in a module - Adding Content using Pages
- Create a page
- Add a PDF to a page
- Embed a video into a Quercus Page
- Create and publish a Page that students can edit - Import or Copy course content
- Making your content accessible in Quercus
- Adding SCORM Content
- Files Area
- Upload and Expand ZIP Files - Quercus course shell quota
- Options for storing files
- Reducing the size of PowerPoint files
Adding content using Modules
The video below shows you how to add content to your course using Modules.
Click here for information on creating Modules with Requirements and Prerequisites
Click on the link below for more information on building your course and using Modules and Pages in Quercus.
Quercus Support Resources - Build Your Course
https://teaching.utoronto.ca/resources/quercus-quick-guide/
The video below explains the differences between Modules & Pages in Quercus.
Quercus Support Resources - Modules and Pages
https://teaching.utoronto.ca/tool-guides/quercus-pages-and-modules/
Adding a link to a video URL in a module
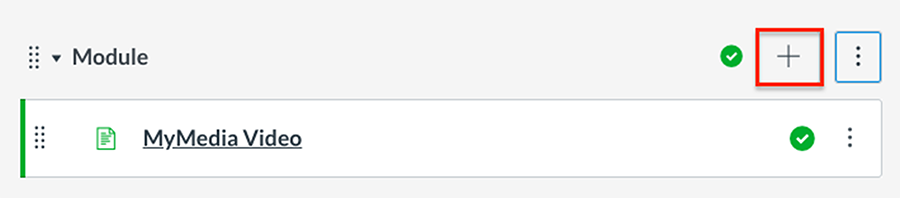
You can add a link to a video URL in a module, as shown in the screen shots below.
1. Click on the + within the module where you would like to add the video link.
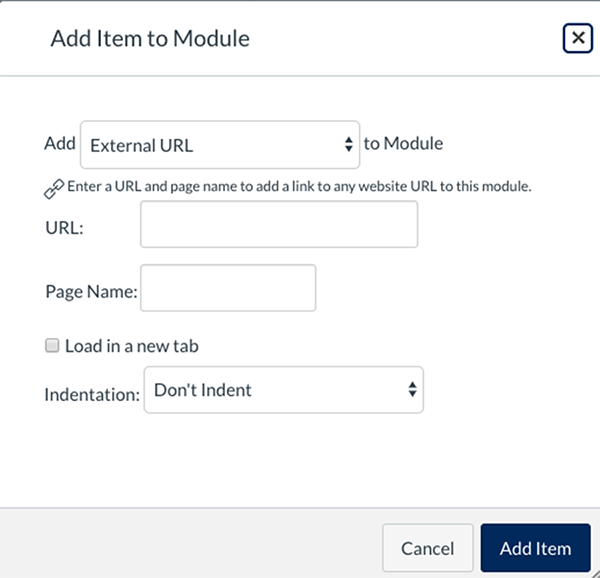
2. Select "External URL" from the dropdown menu.
3. Enter the "URL" and "Page Name" (the name that will appear in the module. In this case, as shown in the screen shot above, the link has been named "MyMedia Video").
4. Optional: select "Load in a new tab".
5. Click the Add Item button.
Adding content using Pages
Create a Page
Below are instructions for creating and publishing a Page:
1. Click on the Pages link in your course menu;
2. Click on the + Page button (if you have already set a Page to be your course Home Page then you will need to first click on the View All Pages button);
3. Name the Page and provide any instructions in the Rich Content Editor box;
Optional: Use the Content Selector to the right to add a link to any assets (pages, annoucnements, files, etc.) that you have already added to Quercus (note, you can upload new Files here).
5. Click on the Save and Publish button.
Add a PDF to a Page
The video below shows you how to add a PDF file to a Page
Embed a Video in a Quercus Page
Once you have created a Page using the instructions mentioned above, you can follow the steps below to embed a video.
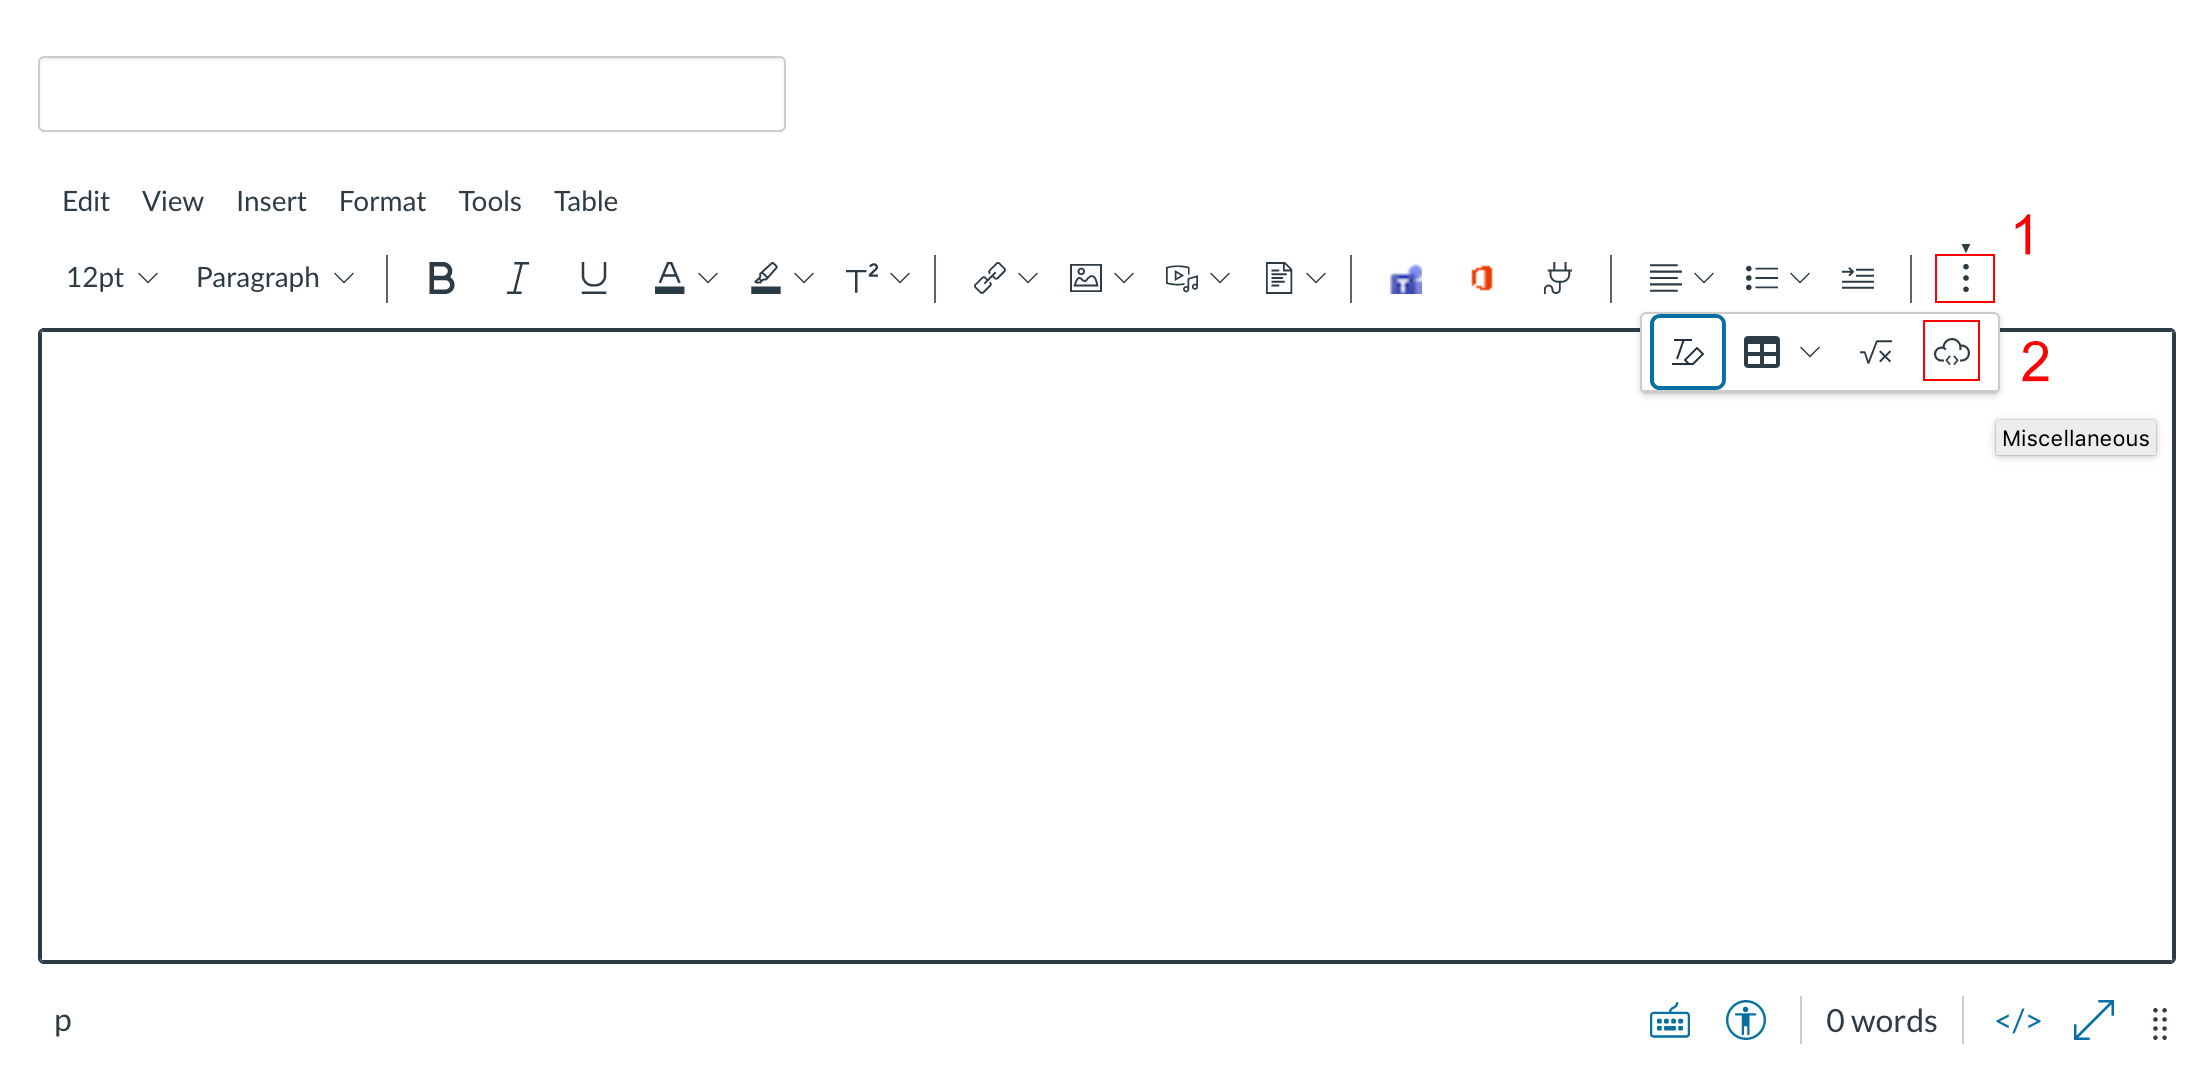
1. In the Rich Content Editor box, click on the vertical 3 dot menu;
2. Click on the cloud icon.
3. In the box that appears, paste the embed code for your video in the Embed Code field.
4. Click on the Submit button.

Create and publish a Page that students can edit
Below are instructions for creating Pages that students can edit:
1. Click on the Pages link in your course menu;
2. Click on the + Page button (if you have set a Page to be your course Home Page then you will need to first click on the View All Pages button);
3. Name the Page and provide any instructions in the Rich Content Editor box;
4. Under the Options section, select “Teachers and students” from the dropdown menu under “Can edit this page role selection”;
5. Click on the Save and Publish button.
You can view the revision history for a page by following the instructions below:
1. Click on the Pages link in your course menu;
2. Click on the page that you would like to view the revision history for (if you have set a Page to be your course Home Page then you will need to first click on the View All Pages button);
3. Click on the 3 vertical dots and in the dropdown menu select “View Page History” and the page’s Revision History will appear on the right-hand side of the page.
Additional Resources
Canvas Community - Add content using Pages
https://community.instructure.com/en/kb/articles/660947-how-do-i-create-a-new-page-in-a-course
Import or Copy course content
Below are links with information on different ways that you can move course content into your Quercus course:
Making your content accessible in Quercus
Canvas Community - Accessibility within Canvas
https://community.instructure.com/en/kb/articles/662723-what-are-the-canvas-accessibility-standards
Adding SCORM (Shareable Content Object Reference Model) Content
Canvas Community - How do I import SCORM files as an assignment?
https://community.instructure.com/en/kb/articles/660683-how-do-i-import-scorm-files-as-an-assignment
Files area
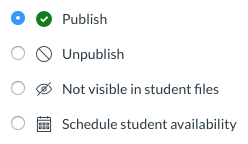
By default, the Files area in your course is disabled, so students can't access it. We recommend that you leave the Files are disabled, and share content with students using Modules or Pages. If you do decide to make the Files area available to your students, a table is provided below showing what the students will see depending on whether the Files area is published or unpublished, and also, the individual file access you have allowed for that particular file.
Note: Whenever you add an item such as an image, PDF, or add an attachment to an announcement, it is automatically added to the Files section of the course
Files Area |
Individual File |
Student Access |

Files area is disabled and greyed out in the course navigation menu and is not visible to students. |
 |
No access, no access if student has link to file |
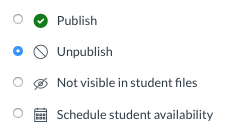 |
No access, no access if student has link to file | |
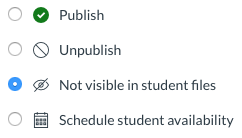 |
No access, no access if student has link to file | |
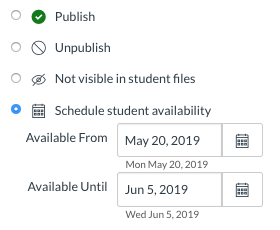 |
No access, no access if student has link to file | |
Files area is enabled in course navigation menu and is visible to students. |
|
Full access |
|
No access If student has link, they receive message that file is locked. |
|
|
Not viewable in Files area, only viewable when student clicks on link provided by instructor | |
|
Viewable by student in Files area during times file has been made available by instructor (there is a note of days and times file is available), only viewable when student clicks on link if it is during times file has been made available. Note: If a student opens the file during the available time, student can take a screen shot, download, and continue to view it until student closes the file and tries to go back in. |
Upload and Expand ZIP Files
You can automatically expand ZIP files that you upload to your Files section in Quercus by following the steps below.
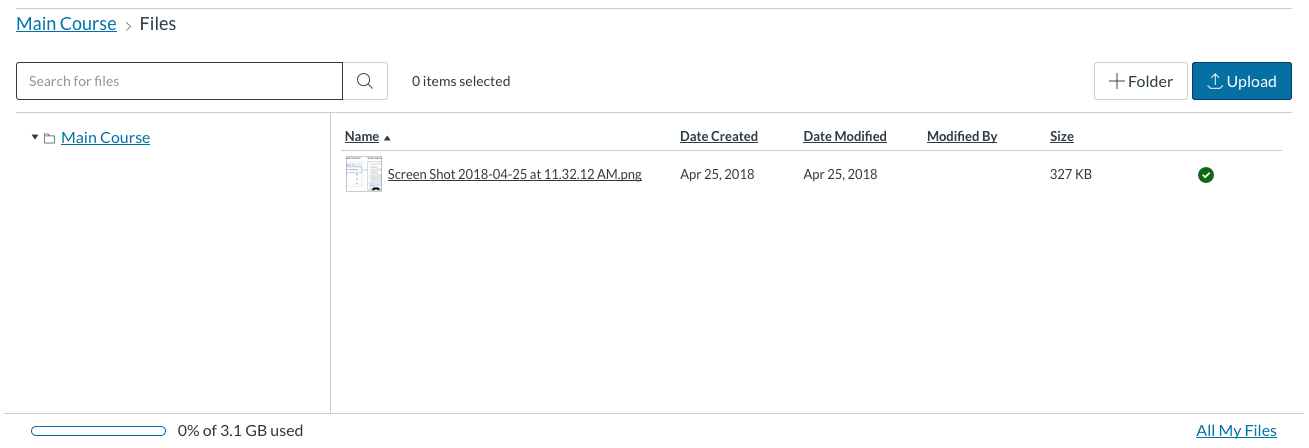
1. Go to Files from your course menu.
2. Click on the Upload button.
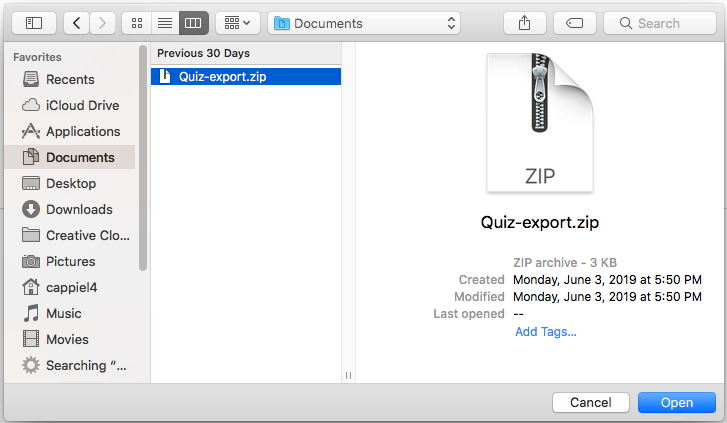
3. Locate and select the ZIP file on your computer.
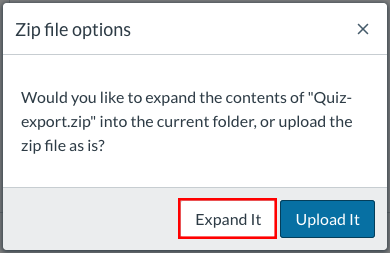
4. Click on the Expand It button.
5. Your ZIP file is now expanded and you will see your files listed in your Files area.

Quercus Course Shell Quota
Options for storing files
Each Quercus course shell has a quota of 3 GB. Instructors and teaching staff may wish to share large files, e.g., video files, or other types of files in a Quercus course shell.
If you have large files, they can be shared with students using OneDrive.
- OneDrive - Login is at https://www.office.com/apps?auth=2&home=1 or is also available at the webpage - https://easi.its.utoronto.ca/shared-services/office365/
If you have large video files, it is recommended that for longer term access and storage, the video content be downloaded and be linked or embedded from one of the following video streaming options:
- MyMedia - https://mymedia.library.utoronto.ca/login (no video size limit for instructors and no time limit), can make it available publicly or to U. of T. (Note: default option is that the video would not be discoverable/searchable). More information on is available at the Using MyMedia webpage - https://instructech.utm.utoronto.ca/av/mymedia
- OneDrive - Login is at https://www.office.com/apps?auth=2&home=1 or is also available at the webpage - https://easi.its.utoronto.ca/shared-services/office365/
Reducing the size of PowerPoint files
It is also recommended that the size of PowerPoint slides and PDFs be reduced, which will use less of the course quota, and make it easier for students to download and access your content.
Below are instructions for reducing PowerPoint and PDF file sizes using a MAC and PC.
PowerPoint:
- Using a PC or Mac to reduce PowerPoint slides file sizes - https://support.microsoft.com/en-us/office/reduce-the-file-size-of-your-powerpoint-presentations-9548ffd4-d853-41e7-8e40-b606bca036b4
- Reduce the file size of an image in PowerPoint for Mac or Windows: https://support.microsoft.com/en-us/office/reduce-the-file-size-of-a-picture-in-microsoft-office-8db7211c-d958-457c-babd-194109eb9535
- Compress Media Files in PowerPoint for Mac or Windows: https://support.microsoft.com/en-us/office/compress-your-media-files-a45c956a-f4a6-4d47-99ef-b408ac5a9a6b
PDF Documents:
- Optimizing PDFs on a Mac or a Windows machine: https://helpx.adobe.com/ca/acrobat/using/optimizing-pdfs-acrobat-pro.html